Sunday, February 27, 2011

Kinda OT, but it's kind of cosplay related so there!

So the second Macross Frontier movie came out in Japan yesterday along with some movie exclusive merchandise being sold in theaters.  Normally I don't care too much for anime memorabilia since I'm more of a gamer, but the Sheryl Nome earring cellphone charm is something I'm dying to have.  If only I can buy it directly through the internet!

シェリルのイヤリングをモチーフにしたストラップ。
(from the Japanese description on the website)


It looks almost exactly like the Sheryl Nome earrings I've made for myself, but man... I want it!  Sure, I could probably make my own charm, but... I made my earrings out of sterling silver, amethyst, and Swarovski crystals and that's not something I'd like to make a cellphone charm out of due to that being expensive.  The charm is around $11 USD, which is pretty affordable in my book.  I wish I had a friend in Japan that could sell me one since shipping would be so much cheaper that way and I wouldn't need a shopping service.

シェリル、ランカをモチーフにしたミニノート2冊セット。
(from the Japanese description on the website)

Not entirely sure what this is, but from my guess it's a small notebook of sorts.  Either way, I still want Sheryl's!  It's so cute... and pink!

シェリルのマークがバッグチャームに!
白うさぎをイメージしたリアルファーとフォールドクォーツをイメージしたアクリルストーン付。
(from the Japanese description on the website)

A cute purse charm based off of Sheryl Nome which includes her symbol, purple gem from her earring, and a white ball of fluff representing her white bunny form.  This is so friggin' cute and I want it.  I really wish I could just buy these right now as there's so many cute promotional items out from the movie!

I am both happy about this new movie, but also really sad because this is the end of Macross Frontier. :(  No more new Sheryl Nome albums, outfits, or anything! DX  Although I've read spoilers on how the movie ends, I still want to see it with my own eyes even if it does take a whole 'nother year for it to come out on bluray disc. ._.

Monday, February 21, 2011

Serenity progress 4

I've been meaning to write a blog on cheap ways to make jewelry, but I'll get around to that either later today or tomorrow once I've fixed a pair of my mother's earrings.

It may not look like much (unless you click for the full view), but I've added a ton of cream colored pearl cabochons to the edges of the circles.  It's totally optional, but I want my dress to look more realistic than "cartoony" as some may prefer.  ...Still waiting on that package to arrive with my lace.  If that package is lost, I'm seriously going to cry, man.

Saturday, February 19, 2011

Serenity progress 3

This thing took a lot longer than I would have liked... I remember working on it from when the sun was up to when the sky was pitch black.  So I think I've spent almost five hours doing the gold beading and adding the first white strip?  The white strips are white textured rope braid and my sewing machine hated sewing through it.  Ugh.  There's still two more strips I have to add, but I'm not doing that until my lace eventually comes in, which'll hopefully arrive within the next few weeks.

I've made a mistake when sewing the strip on and because of that, I hate this bodice so much.  Guergh... nothing I can do about that now, sadly...

Not even done and this thing is already heavy as heck because of the white rings and glass beads.  When this part is finished, it's going to be even heavier so I may end up having to install some clear bra straps if it doesn't stay up due to the added weight.  It stays up just fine right now, but... not so sure about later.  I'm still trying to figure out how I'm going to pack this thing in my luggage when it's time to go to AM2 Con and Anime Expo this summer.  The fabric for the skirt is also quite heavy since there's going to be 12 yards of fabric going into that monster... GRAAAAHHH!!!

Wednesday, February 16, 2011

Pause

There's been a death in my family recently.  I'll be busy over the next week helping prepare for the funeral and wake.  I'll be doing a ton of cooking for out-of-town "family" until next Thursday.  I won't be updating too much until everything is over.

Tuesday, February 15, 2011

Serenity gown progress [Part 2]

Hahaaaa... wow.  This is quite annoying.  Firefox won't let me update, so I have to do it on a browser that I hate.  Ugh.  Anyway, I've spent most of my free time today working on this bloomy dress bodice.


The rings were always a nightmare to attatch to this dress.  This is my second time making this dress and it's never any fun doing this step.  I've come up with an easier method of making the rings, but it's always a huge pain in the butt to sew them on.  Rings are made out of white pleather (that I had leftover from when I made my Crisis Core Aerith shoes), white glitter casa satin, and heavy interfacing for added stiffness.  At first, I used straight stitches to attach them, but the edges didn't lay the way I wanted them to so I went over them again with a zig-zag stitch.

The whole process was a complete nightmare and is always my least favorite task when making Serenity's dress.  Boning was added as well since the lining was starting to fray so bad that if I didn't add the lining soon, I probably wouldn't have been able to at all, so I inserted the boning into the casings and serged the fraying bottom edge of the lining.  I'm glad that part is over with at least... now I just have to reinforce the tops of the rings.  After that is done, I can start beading this thing.  I'm still waiting for my lace to come in the mail, but I'm afraid that it may take another month to arrive and I need it now. Grrr!!!

Sunday, February 13, 2011

I'll update with more content tomorrow, I promise!

I've been busy with sewing and trying to diet and exercise more, so I haven't had much time to update this.  So until then, have a kitten:

Wednesday, February 9, 2011

Serenity gown progress [Part 1]

I've been busy for the past few days working on this gown and answering a ton of emails (which were questions about wigs), but now I have some free time to update this blog, yay!  Today is a dump of progress photos and descriptions on how I did things.

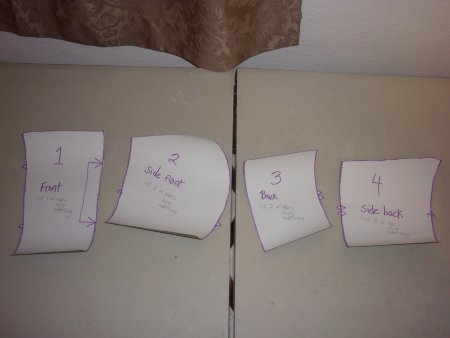
This is the pattern I made for the bodice of the dress.  I'm cheap (and personally I find pattern paper to be a waste of money), so I used some ancient cheap wrapping paper I bought for $1 and drew the pattern onto that.  Newspaper is another cheap alternative for pattern making, but the ink can rub off... so whenever I use newspaper, I always wash the garment when it's done, but yeah... I PREFER CHEAP WRAPPING PAPER.

Pinned the pattern to white lining fabric.  I'm using a cheap white posh lining since it feels nice against my skin and... it's cheap.  Joann's carries a matching casa lining for their casa fabrics, but honestly, why pay $5.99/yard (before a coupon) for lining when you can pay $2.99/yard (before a coupon)?  The stuff goes beneath the outer layer, so to me it's pointless to spend a lot of money for lining.  Anyway, the lining I'm using was left over from two previous princess costumes I've made.

And of course, the pattern pinned to the white casa satin (outer layer).

Pinned the pattern to the underlining.  For my underlining, I'm using white organza (because I have 9 yards of the bloomy stuff laying around).  Underlining generally serves to hide seam lines in a bodice once they've been pressed open and they're practically a necessity if the bodice you're making is white (which mine obviously is).  Another reason I'm doing this is to add a little bit of strength to the bodice for when I add a buttload of embellishments to it.

So I cut everything out and sewed the underlining to the casa satin (on the wrong side of the fabric, of course).

And of course... you sew it together.

Pressed the seams open and voila!  This is the underlining sewn together with the satin.  If you don't press your seams, everything looks pretty... crappy when you're finished.  The fabric just won't lay right.  At all.

And the lining sewn together.  I was an idiot and made my images too small today and you can't see the casings I've made for the boning... but they're there.  Didn't press the seams open for that reason.

Carefully pinned the satin and the lining together (on the wrong side).  I forgot to mention way earlier, but I do not recommend this project to a beginner.  All of the fabrics I'm using are either delicate or fray like no tomorrow.  ...Which brings us to what I did next!

SERGE IT!  SERGE IT GOOD.  My biggest pet peeve when it comes to sewing aside from loose buttons are fraying edges.  Fabrics such as satin, organza, chiffon, and certain linings fray badly so a serger is a must in my book.  The fabric was fraying quite badly so I ran the top raw edges through my serger.  For those of you who don't have a serger, there are sewing machine attachment foots or you can use the good 'ol zip-zag stitch method (which is folding the raw wedges older then securing them with the zip-zag stitch).  It's quite time consuming and annoying to do... which is why I basically said, "SCREW IT!!" and bought a serger.

The bodice after its been turned inside-out and pinned.  I'm about to iron where I've placed the pins so it lays flat.  After that... well... that's where the "fun" part begins.

The white moon ring... thingies!  I made a stencil to make mine look uniform and neat.  I wanted my rings to be a good enough size so I wouldn't have to sew on like, 20 bloody rings so I did my math, figured out I'd need 12 rings and they measure around 2.5in.  There's 13 in this picture because I made an extra just in case I had to cut one in half for the back.  And of course, the peach ring thing is my stencil.  There's still a lot of work to do to prep these things before I can sew them on... ugh.


So yeah... that's what I've been up to!  Hopefully the special lace I've ordered will come in the mail later this month so I can finish this gown within the next few weeks.  I've learned my lesson about lace when I made my Crisis Core Aerith Gainsborough dress last summer... making your own trims from scratch is not fun no matter what.  I almost went insane making all the trims for that... I'll probably post pictures of that thing later.