Pinned the pattern to white lining fabric. I'm using a cheap white posh lining since it feels nice against my skin and... it's cheap. Joann's carries a matching casa lining for their casa fabrics, but honestly, why pay $5.99/yard (before a coupon) for lining when you can pay $2.99/yard (before a coupon)? The stuff goes beneath the outer layer, so to me it's pointless to spend a lot of money for lining. Anyway, the lining I'm using was left over from two previous princess costumes I've made.
And of course, the pattern pinned to the white casa satin (outer layer).
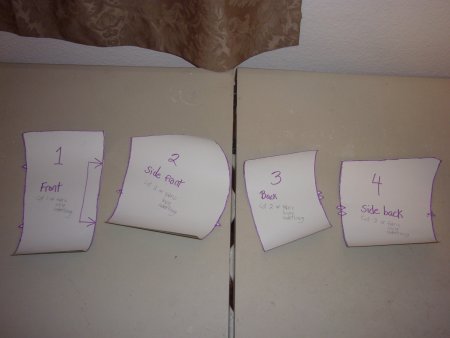
Pinned the pattern to the underlining. For my underlining, I'm using white organza (because I have 9 yards of the bloomy stuff laying around). Underlining generally serves to hide seam lines in a bodice once they've been pressed open and they're practically a necessity if the bodice you're making is white (which mine obviously is). Another reason I'm doing this is to add a little bit of strength to the bodice for when I add a buttload of embellishments to it.
So I cut everything out and sewed the underlining to the casa satin (on the wrong side of the fabric, of course).


And the lining sewn together. I was an idiot and made my images too small today and you can't see the casings I've made for the boning... but they're there. Didn't press the seams open for that reason.
Carefully pinned the satin and the lining together (on the wrong side). I forgot to mention way earlier, but I do not recommend this project to a beginner. All of the fabrics I'm using are either delicate or fray like no tomorrow. ...Which brings us to what I did next!
SERGE IT! SERGE IT GOOD. My biggest pet peeve when it comes to sewing aside from loose buttons are fraying edges. Fabrics such as satin, organza, chiffon, and certain linings fray badly so a serger is a must in my book. The fabric was fraying quite badly so I ran the top raw edges through my serger. For those of you who don't have a serger, there are sewing machine attachment foots or you can use the good 'ol zip-zag stitch method (which is folding the raw wedges older then securing them with the zip-zag stitch). It's quite time consuming and annoying to do... which is why I basically said, "SCREW IT!!" and bought a serger.


So yeah... that's what I've been up to! Hopefully the special lace I've ordered will come in the mail later this month so I can finish this gown within the next few weeks. I've learned my lesson about lace when I made my Crisis Core Aerith Gainsborough dress last summer... making your own trims from scratch is not fun no matter what. I almost went insane making all the trims for that... I'll probably post pictures of that thing later.
Looks pretty good so far.
ReplyDeleteGosh Looks like soo much work good luck!
ReplyDeleteDamn. That looks like a lot of effort.
ReplyDeleteCan't wait to see it when its finished.
ReplyDeleteYeah I really want to see how this will look when it's finished.
ReplyDeleteGreat work!
ReplyDelete