Showing posts with label cosplay. Show all posts

Monday, January 6, 2014

Sailor Moon Miracle Romance Shining Moon Powder Compact REVIEW

So it's been a long time since I've done an item review but now that I have better equipment, I can actually do them again!  I'm going to re-do my Yuna and Kairi necklace ones with better pictures... and actually do my Serah pendant one but for the time being, Sailor Moon!

Last summer, the Premium Bandai website announced that they were going to release a special line of Sailor Moon cosmetic items aimed at those who grew up with the original 90s show (aka women).  This line started out with cosmetics and the first of which to be released was the powder compact priced for sale at 3,999 Yen (around $38 USD).  When this announcement was made they said that they had plans to release this item overseas but sadly, they don't seem to plan on making good on that promise.  I believe they only got so far as Hong Kong... not the western market.  Since I felt its better to be safe than sorry and wait on that, I went on and bought my compact through Mio Boutique Tokyo where it has since then sold out and is out of production.  This item was incredibly hard to get your hands on outside of Japan because inside of the country, they were only allowing 2 items per household making it pretty much near impossible for shopping services to get them for people.  There were 2 rounds of pre-orders for this item both of which sold out within hours.  Finally, they had another round of pre-orders that was unlimited (and once again, Japan only).  I was able to secure one through this and these pre-orders were up for only a week before they sold out for good.

I paid roughly $43 for my compact sometime in June 2013 and waited 6 months for Bandai to ship them.  In total, my compact came to $57 including EMS shipping from Mio Boutique Tokyo to me.  Not a bad deal at all if I do say so myself.  I've been wanting a Sailor Moon compact since I was 7 years old and figured this may very well be my only chance to nab an affordable one.  A few days ago after a ton of drama with my designated post office, my compact arrived!  Onto the photos:

(Click to enlarge the photos)
The box is a pretty sugar pink color with a silver silhouette of Princess Serenity

Side of the box

...another side of the box.  The other side of the box has a silver silhouette of Luna but it kept photographing blurry so I don't have a picture of that.  I may do a video when I'm not feeling lazy but who knows!


The bottom of the box

Inside flaps of the box that say, "Moon Prism Power Make Up!" in a rainbow font.  I thought that was a pretty cute touch.

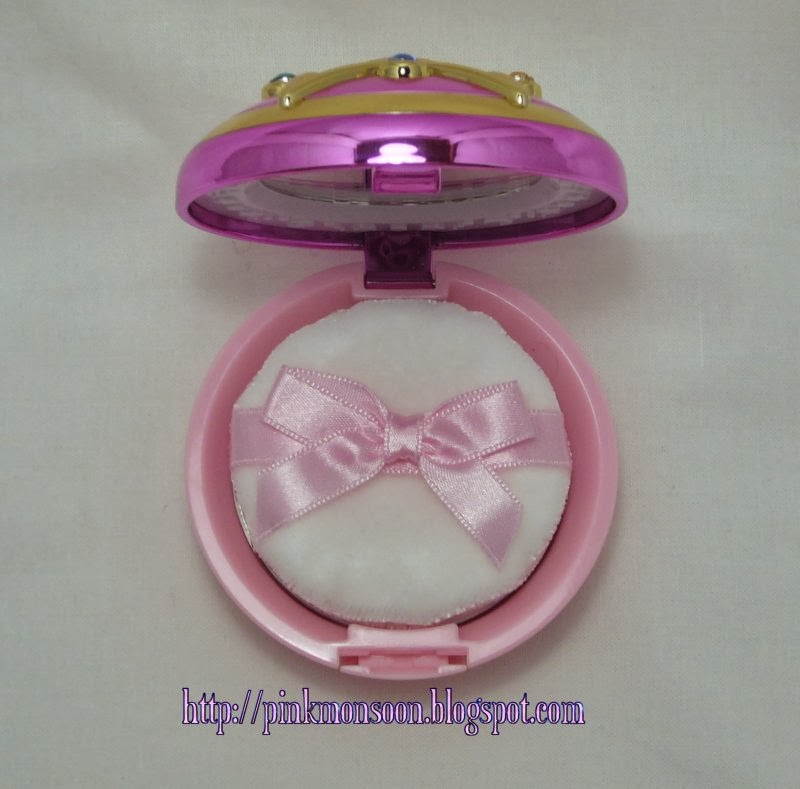
Onto what everyone wants, the compact!  It's nice and shiny and has acrylic rhinestones.  I consider this to be a step up from the original 90s Japanese toy since that one just had color plastic instead of "crystals."

The compact by itself.  It's a nice size but...

DEFINE COMPACT FOR ME, PLEASE.  Out of all the compacts that I own (and I collect them), this is by far the fattest and most impractical one of them all!  Powder compacts are typically thicker than dual mirror ones (duh) but I think this one is just a bit much...  It opens by pressing on the rectangle.

View of the bottom


The compact opened.  It comes with a really cute powder puff.  It's quite small compared to every other powder puff that comes in my other compacts though.

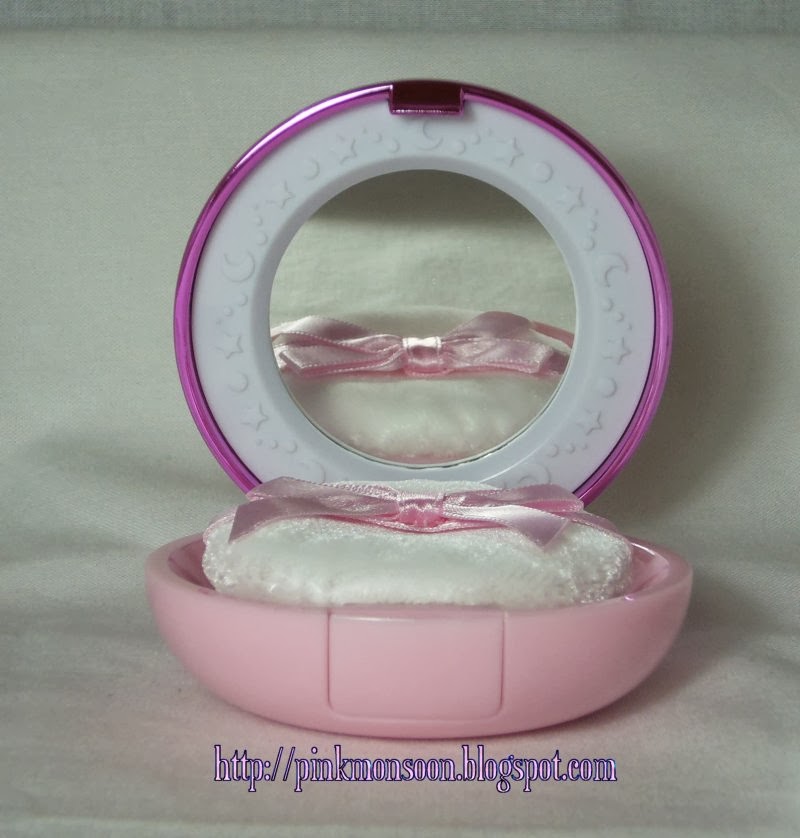
Opened compact for a view of the mirror.  The mirror is very tiny and impractical.  I could hardly see myself in it because it's so small... but the moon and star relief surrounding it is pretty cute.


The compact opened showing the design of the silver crystal and ribbon.  Now this is where I become very disappointed.  In the promotional photos of the compact, I couldn't tell how the powder and powder puff would be separated but...

...as you can see here, the only thing separating the powder, the powder puff, and the mirror is a crappy sheet of clear plastic with the crystal and ribbon printed on it.  I found this to be very cheap and tacky.  Most high quality powder compacts have a separating compartment to store the powder puff beneath it.  This was a very stupid decision on Bandai's part not to include this feature.


All in all, it's a pretty cute but very impractical powder compact.  Originally, I planned on actually using this compact for the mirror and keeping it in a silk pouch so it would be safe in my purse but... this thing is way too chunky!  I was honestly expecting it to look a bit nicer too since its aimed at adult women but it looks just as childish as the finish on the 90s toys.  The construction of the compact left me unsatisfied as well since there really wasn't anything to separate the mirror, powder puff, and powder from one another except for a crummy round sheet of plastic.  That's... not very practical for a functional compact.  I haven't tested the quality of the powder (and I probably won't at this point) but it does smell pretty nice.  On the Premium Bandai website its described as smelling like "princess rose."  I don't really think it smells a thing like a rose but the smell is quite pretty and inoffensive.

Now for the quality of the powder itself... it's pretty mediocre drug store quality but I was expecting that since this item was marketed solely for its packaging.  It's a pretty crappy as far as highlighters are concerned and its filled with small glitter rather than quality mica powder.  It doesn't pick up very well and goes on quite cakey.  It's decent for reducing the look of oil but all in all, the powder is lousy but who actually bought this for the product alone?  The compact is a cute collectible and my classmates in cosmetology school comment on it all the time (and laugh at its size) but if you're looking for a good highlighter, I highly recommend Too Faced's Candelight Glow Highlighting Powder Duo.

As for where to buy this compact, as of right now the only place that I know of is on eBay although you will be paying higher than retail prices for it as this is a sold out limited edition item.  If you're a Sailor Moon collector, I recommend it as a piece for your collection.  For those of you who wanted to actually use this compact... I don't really recommend it since it's very impractical.  The next upcoming Sailor Moon anniversary item on my list is the Proplica Crescent Moon wand!  I've been wanting a crescent moon wand my entire childhood and I went on and pre-ordered mine through Ami Ami.  From what I've seen, it looks a lot better than the sought after Sailor Moon World version of the wand and the (now) funny looking 90s toy.  Best of all, it's perfect for cosplay!  I'll finally have a pretty prop for Princess and Queen Serenity. ;__;

Tuesday, September 3, 2013

Storenvy shop now open!

I've spent the past week or so trying to set up my new sales account over at Storenvy and it's all up and running now!  Halloween is coming up and since not everyone wants to make an account to shop at Etsy, I've set up on Storenvy to make things a little easier for myself and everyone.  However, unlike the Etsy store, Shopenvy will only accept Paypal so no credit cards this time around.  I will be keeping both stores open though!  The Shopenvy store will have more items listed since they have a lot more benefits for me selling there versus Etsy (Facebook app, no sellers fees, more layout customization, etc.).  When I open back up for cosplay and wig commissions again, it will more than likely be over at Storenvy since it'll be cheaper for everyone that way.

I'm still selling mermaid bras for Halloween so drop by either store!  I hear that Lady Gaga's seashell bikini outfit from the VMAs will be a popular costume this year.  If you're looking for the white seashell bra that she wore, drop on by!

I expect to open back up for cosplay commissions sometime after Halloween so keep a look out and add my shop to your favorites!


Saturday, August 10, 2013

Something that has confused me for a while...

...and that is why do people buy cosplay wigs from Hello Cosplay?  I mean, come on people!  You can get the same wig on eBay FOR A LOT LESS MONEY.  For example, a long unstyled wig on Hello Cosplay's site costs $30 plus $15 shipping (if you're in the USA) bringing your total cost up to $45.  Then there's eBay... you can get the same wig for $23-$28 and not have to pay shipping!  Then there's the recent drama about this company stealing images of products sold by other sellers.  Chances are high you will not get what you think you're getting in the photo.

If you're looking for a cheap cosplay wig and you're just starting out, check out eBay!!  Seriously people, they have some of the cheapest un-styled cosplay wigs you can find outside of Taobao.  eBay wigs are often the cheapest cosplay wigs you can find when you're new and on a budget.  The key to finding a good eBay wig is research and checking out the seller's feedback.  If I'm looking for a cheap wig to style or do some experimenting on, I usually check out sellers like CosplayDNA and cosplaywig.  CosplayDNA has some really cheap wigs that are okay in terms of quality since they're pretty shiny.  cosplaywig is pretty much the same but a little pricier and offers pre-styled character wigs.

All in all... check eBay before throwing your money away on a random Chinese cosplay website.  Sure, the wigs from the 2 sellers I recommended ship directly from China but you'll get a much better price than you would get at places like Hello Cosplay and Cosplay House.  Research is the key!

Saturday, March 30, 2013

Sailor Moon Usagi Tsukino ring giveaway!!!


Hey, guys!  From now until April 14th, I am holding a Facebook giveaway for my popular Usagi Tsukino engagement ring!  The contest is being held on Facebook and one lucky person will win!  Do not miss this chance!  Click here for how to win!

Wednesday, January 23, 2013

Upcoming wig projects

I've decided to take on a few new wig projects in between working on my personal cosplays for convention season.  I will be offering various styled wigs in my shop soon!  One of the upcoming styles will be Mimi Tachikawa (Digimon Adventure season 2)!  It's a wig I've been wanting to style for a long time and since I never got any requests for it, I'll just style it for fun then sell it off.  It'll be a fun way to learn to use a few new styling methods!  It will also come with the cute little star clips. :)

Stay tuned for rave wigs making their way to Celcia's Creations!

Saturday, October 20, 2012

Crystal and pearl encrusted Ariel mermaid seashell bra!


(Customer requested example)

Now available in my Etsy store!

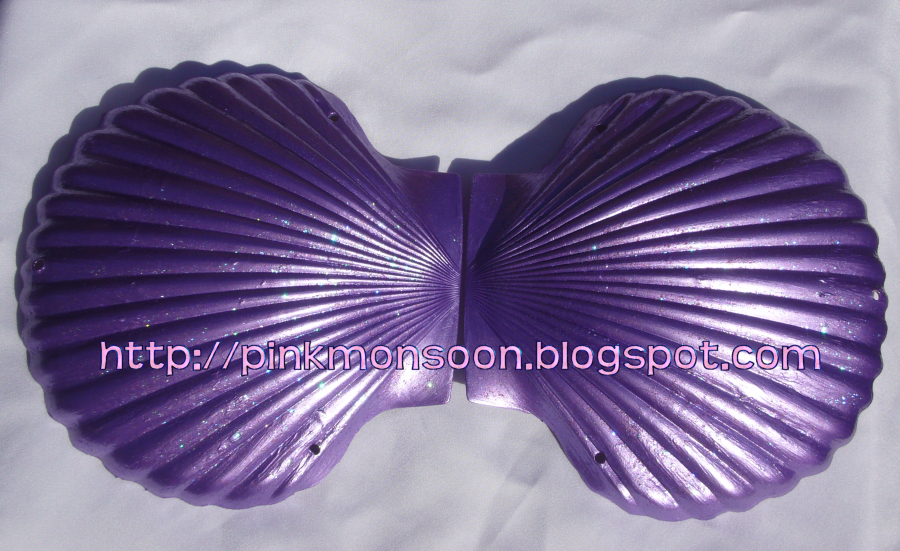
Up for sale is a pair of Ariel style mermaid seashell bra shells! Unlike real seashells, these are made out of plastic and will not shatter if they are dropped. Also unlike a real seashell, these are light weight and very sturdy! They'll endure years and years of wear and tear. Each shell has been bedazzled with 5 different kinds of pearls (plastic, glass, and real freshwater pearls) of varying sizes. A generous amount of genuine Swarovski crystals (not cheap rhinestones!!) for a maximum amount of shine. The purple paint also has glitter! Super sparkly!

This is *not* a finished bra! You are only getting the finished shells--assembly is up to you because everyone has a unique frame. They can be easily glued onto a bra (with fabric glue), sewn into the bra through the holes on the shells, worn bikini-style with ribbons, or attached to a stick-on bra with adhesive. They can fit anywhere from a 32A cup to a 36D cup (anything larger than that will show lots of cleavage). The shells measure 6 x 6 inches. I make these very sparkly and my camera doesn't pick it up too well, but it can be better viewed in this video:


Buy today and become your favorite mermaid princess!                                            

If you have any questions, please ask me though my Etsy store in a conversation (because comment notifications here don't get reply notifications).  Thanks for looking!


Sunday, September 30, 2012

Customizable mermaid seashell bras for sale!

I've improved my previous mermaid seashell bras just in time for Halloween!  I'm selling the older models for a discounted rate in my shop.


Now available in gradient colors!


(A video of the deluxe version with crystals and pearls in action!  Super Sparkly!)

These can be any color you like (including color gradients) and are made out of a sturdy plastic. Available in red, orange, yellow, green, blue, pink, gold, silver, grey, black--any color you name it! Unlike a real seashell, these will not shatter if they drop to the floor! Realistic shape and very sturdy; they are made to last for years of wear and tear. Each set is individually hand painted which means no two bras will ever be the same.

This is *not* a finished bra! You are only getting the finished shells--assembly is up to you because everyone has a unique frame. They can be easily glued onto a bra (with fabric glue), sewn into the bra through the holes on the shells, worn bikini-style with ribbons, or attached to a stick-on bra with adhesive. They can fit anywhere from a 32A cup to a 36C cup (anything larger than that will show lots of cleavage but is still wearable). The shells measure 6 x 6 inches.

If you are interested in buying one of these or viewing my other costume items, check out my shop listing!  You can also view my storefront here.

I make these extra sparkly for a magical mermaid look.  To better view the sparkle, check out this Youtube video:


Customizable mermaid seashell bras for sale!

I've improved my previous mermaid seashell bras just in time for Halloween!  I'm selling the older models for a discounted rate in my shop.


(A video of the glittery solid colored shells in motion)


Now available in gradient colors!


(A video of the deluxe version with crystals and pearls in action!  Super Sparkly!)

These can be any color you like (including color gradients) and are made out of a sturdy plastic. Available in red, orange, yellow, green, blue, pink, gold, silver, grey, black--any color you name it! Unlike a real seashell, these will not shatter if they drop to the floor! Realistic shape and very sturdy; they are made to last for years of wear and tear. Each set is individually hand painted which means no two bras will ever be the same.

This is *not* a finished bra! You are only getting the finished shells--assembly is up to you because everyone has a unique frame. They can be easily glued onto a bra (with fabric glue), sewn into the bra through the holes on the shells, worn bikini-style with ribbons, or attached to a stick-on bra with adhesive. They can fit anywhere from a 32A cup to a 36C cup (anything larger than that will show lots of cleavage but is still wearable). The shells measure 6 x 6 inches.

If you are interested in buying one of these or viewing my other costume items, check out my shop listing!  You can also view my storefront here.

I make these extra sparkly for a magical mermaid look.  To better view the sparkle, check out this Youtube video:


Sunday, July 22, 2012

So I just bought materials for Serah and... another character

I went to Joann's the other day with a book full of 50% off coupons to buy materials for Serah, some jewelry making supplies (for shop items), and some fabric for... another character.  I'm going to keep that other character under wraps for now until it's time for me to debut it.  I'll just say that I love this character a lot and she quickly became a favorite.

I bought:

  • 1 1/2 yards of casa chiffon in light pink for Serah ($7.49)
  • 1 1/2 yards of basic combed cotton for Serah ($3.74)
  • 2 yards of violet casa crepe for another cosplay ($7.99)
  • 2 packs of black buttons for Serah ($1.80)


I bought a few other things but thanks to all of the 50% off coupons I had, it brought a $79 bill down to about $41.  If it weren't for those coupons, man!

Serah's turning out to be an expensive cosplay mainly because of the jewelry I bought from the Square-Enix store but I bought it mainly because I'm a collector.  I'm still kicking myself for missing out on Squall's griever necklace and it's out of production now (insert tears here).  The wig cost me about $35 on eBay which is worth every penny.  The quality is fantastic but it needs a lot of major styling to get it perfect since the ponytail wasn't exactly to the side.  It's the perfect color and it has a skin-part and that's what really matters.

I bought the lace for the skirt from a Taobao store and it needs to be dyed black but other than that, it's the perfect pattern!  The stockings were a gift from my friend and they came from Sock Dreams (they're the only store that sells them long enough to reach my thighs since I'm so tall).  The boots... I need to make covers for a pair of ankle boots I own since I've never seen a pair of already existing shoes that didn't come from an overpriced eBay store look like hers.  A lot of people use converse sneakers but to me those don't look right and don't flatter the legs when wearing thigh-high stockings.  I bought the tear-drop crystals for the bracelet and hair tie off of an eBay seller for pretty cheap but I still need to get off my lazy butt and actually make said accessories.

The only thing I can't really hunt down is fabric for the skirt... I've never seen a red plaid that came even close to the fabric of Serah's skirt so I'm going to have to custom print that if I want to be satisfied with this costume.  Gotta bite the bullet, I guess... I'll need at least 2 yards.  I have the pattern for the skirt already (thank you Joann's for $1 Simplicity pattern sales!) but I'll have to make my own patterns for the shirt and duster which shouldn't be too hard.  The ribbons for the back of my duster will be made out of light pink casa satin since I have that laying around from a Lina Inverse costume that is on indefinite hiatus.  It'll come in handy for something!

Total for this cosplay so far?  Somewhere over $400 mostly because of the earrings and necklace.  That price can be easily avoided by making your own or buying those two items off of Etsy but yeah.  Speaking of which, I'm going to try my hand at making Serah's earrings soon.  My friend plans on cosplaying as Serah in the future and she of course needs a pair of earrings.  Not sure if I'll attempt to make the necklace but the earrings look easy enough.  I'll start selling those in my Etsy shop depending on how hard or easy they are for me to produce.

Sunday, April 8, 2012

Usagi Tsukino's engagement ring (updated version)

Edit 4/31/13:  I am holding a giveaway to win one here!

I've recently updated my Usagi Tsukino (from Sailor Moon) ring replicas.  Now they are on slimmer bands so they're more accurate!  I am of course, selling them in my Etsy store along with various other goodies.

Direct link to the listing can be found here.


Details are similar to the previous version.  The only difference is the band is slimmer.  The jewels are clear cubic zirconia and simulated pink moonstone.  The band is silver-colored copper.  It's an adjustable band so it will be able to fit multiple sizes (usually up to a 10) comfortably.

Because several people have asked me, I will say this again.  You will not be able to find a real diamond ring at the price I'm offering these for!  Genuine diamond rings start at about $800 and those jewels will be small at best and let's not forget the fluctuating prices of gold, silver, and platinum.  My price is cheaper than the going price of the eBay versions and more accurate when compared to a reference picture:


I try my best to keep them at a reasonable since the prices on eBay are downright ridiculous and they aren’t even accurate.  I mean come on, there isn’t a friggin’ “split” in the band in the artwork.  That girl doesn’t even know a thing about jewelry terminology so she’s obviously not making them.  And hers one is nowhere near as “rare” as she claims to even try justifying that $60 price tag. -__-

Thursday, March 22, 2012

Now selling: Usagi Tsukino's engagement ring!

Edit 4/31/13:  I am holding a giveaway for one here until April 14th, 2013.

Edit 4/8/12:  The updated version of it can be found here.

I've been working on replicating the engagement ring that Usagi Tsukino (from Sailor Moon) wears in season 5 of the anime and last arc of the manga "Sailor Moon Sailor Stars."  I've created two so far and hope to make more in the future.  Here's a compiled picture:


The ring is made out of clear cubic zirconia, simulated pink moonstone, and silver colored brass.  If you're interested in buying, check out the listing in my Etsy shop!  Much cheaper than those listed on eBay!

Reference image: 


Saturday, January 21, 2012

Dream Angels Rinoa duster review

Back sometime in 2008, I paid the website Dream Angels to make a customized Rinoa Heartilly duster and sleeve set for me.  Usually, I make my own stuff but finding the right rib knit fabric for Rinoa usually proves nothing short of impossible (unless you get lucky).  The other option is to hand knit it, but I didn't know how to.  I've heard nothing but good things about their Rinoa dusters so I decided to take the plunge and buy one.  Everything went great at first, I paid for everything, gave my measurements, and received my item within 2-3 weeks.  It looked beautiful, but I noticed right off the bat that it was not properly hemmed nor was it overlocked.  If someone is paying you $130 for a costume, you better hem it properly!  Of course, I contacted them and guess what?  She never returned my emails!  I've sent her several and never received a single reply.  I gave up, decided to make the best of it and try wearing it.


I wore this duster for a grand total of two times: once for a mini photoshoot and another for one day at a convention.  It was starting to look kinda dirty so I decided to hand wash it.  Oh my gods, was that ever a mistake.  In fact, just buying it was a mistake.  After just one gentle hand wash (with my very own two hands), the raw edges started to look like this:


Would you sell a costume this shitty to someone for $130!?  I hand washed it once in cool water and gentle detergent and this is how bad it looked afterwards.  Not only did it fray like no tomorrow, but it shrunk up quite a noticeable amount!!  I'm 5'10 and it shrunk up so much that it was small enough to fit someone that's 5'2!  I didn't even put this thing in the drier, either--I lay it flat to air dry.  In fact, while I was washing it, the water turned blue and there were tiny pieces of fabric all over my sink.


Then to start with, the sleeves were always too damn small.  I need them to be at least 11in. and you can clearly see from this picture that they are 8in. long.  It looked really stupid on me.

Because the duster had shrunk up so much that it was unwearable (unless I wanted to look really stupid), I ended up selling it off for less than half of what I paid for it due to the quality.  If someone is paying you a lot of money to make something, you had better know what the hell you're doing and if you don't, don't accept commissions!!  I can't believe that this company has such glowing reviews and feedback when their product is less than stellar.  You do not make and sell a custom-made item to someone with very visible raw edges, hems that are not properly hemmed, and most importantly, you don't sell something where you didn't pre-treat the fabric!

I cannot stress the importance of pre-treating your fabrics to eliminate any possible shrinkage or you'll end up with a garment that won't survive the wash.

My whole experience with Dream Angels has been an unpleasant one and I do not recommend commissioning them or Sakura Wigs.  I've had an experience with Heki-chan or whatever her name is around the same time I ordered my duster from Dream Angels.

Thursday, December 15, 2011

About "casa" satin

I'm surprised I'm even writing an entry with how depressed I am about my dog being lost.

Casa satin is this really nice, heavy, dull sheen satin that is perfect for special occasion dresses and princess gowns.  Casa satin is really just the Joann's term for their line of "house" fabrics (such as casa satin, casa chiffon, casa crepe, casa organza, and casa lining).  A suitable replacement for it if you're searching elsewhere (like the New York garment district, the Los Angeles fashion district, or some other store) would be bridal satin.  The term bridal satin can be used for just about any kind of heavy satin with a dull sheen.

There are people who say you should never make a cosplay out of satin, but they are typically ignorant of the different kinds of satin out there and are only familiar with the cheap shiny costume satin.  Costume satin is a lot thinner and shinier, which damages quite easily and is prone to getting runs.  Bridal satin is thicker and less shiny which is less prone to damage.  Both fabrics still fray like no tomorrow when unfinished, but there's always pinking shears, frayblock, and sergers (the recommended method) to combat fraying.  It's also recommended to use a lightweight needles and increase your sewing machine's tension when sewing satin to avoid puckering.

If you're making something like a Disney Princess gown (Cinderella, Aurora, Tiana, Belle, Snow White, Ariel, parts of Rapunzel's skirt) bridal satins are the perfect fabric for this.  I cannot stress this enough but please do not use cheap costume poly satin!  It cheapens the appearance of the gown and gives it a super costume-y look.  With bridal satin, it gives it a more realistic "princessy" look.  If you have a Joanns in your area, you can use casa satin from their special occasion fabric line.  The stuff is kinda pricey at $7.99/yard, but when you sign up to receive their 40% off coupons it becomes more affordable and even better when they send their 50% off ones.

Long story short, casa satin is more or less bridal satin but with a different name.

Monday, November 14, 2011

Wig commission information

I'm accepting commissions for wigs (almost) year-round and here's the information if you're interested!

I have been styling wigs for a little over four years now. I specialize in two-toned, high ponytail, pigtail, curly and wavy, Sailor Moon, and natural styled wigs although there are other styles I can create as well. The only kind I will not do are super spiky, gravity defying, complex styles of apocalyptic doom (such as Envy, Ryoko, Washu, Yami/Yugi, SS3 Goku, and Axel for example). I can also do custom colors on wigs. The type of fibers I work with are heat-resistant, kanekalon, and Elora. My pricing is based on the cost of materials, styling, and shipping. Wigs can take anywhere between 6 to 8 weeks for completion and it is recommended to order in a timely matter so they can be delivered to you in time for your event.


I accept Paypal, money orders, cashiers checks, and concealed cash (at your own risk). In order to start your wig, I require the cost of materials to be paid upfront and the rest paid upon completion. I'm based in the United States, but will ship internationally for an additional cost. Wigs are shipped in a large box and on a wig head by Priority Mail.


I'm going to put this out there right now.  You will not get a $30 wig from me.  It isn't possible because you are paying for both the materials and my time.  Materials on average can run anywhere from $55-$90+ depending on the wig.  If you are interested in purchasing a custom wig from me, send me an email at celciaREMOVETHIS@inbox.com with "Wig commission" as your subject line or you can send me a conversation through my Etsy account (click on "contact").  Examples of my work:


Usagi Tsukino from Sailor Moon

Sheryl Nome from Macross Frontier

Zhen Ji from Dynasty Warriors 6

Akroma, Angel of Wrath from Magic the Gathering


I'm not taking orders for spiky or super fluffy wigs at this time since I'm not really experienced with those.  

Tuesday, November 8, 2011

New Sailor Moon wig finished!

I've finished a new Sailor Moon wig commission just the other day and this one turned out even better than the last one!  I used different a different method (which was even more time consuming, but it was safer) and it turned out just wonderful. :)


If you're interested in owning a wig like this one, visit my Etsy store and I can custom make one just for you in any color you'd like!

Custom Sailor Moon wig commissions!

Hello there everyone!  Sorry for the lack of updates, but I've been busy with commission work (so life has been a doozy).  After the latest wig commission I've done, I am now offering custom-made Sailor Moon wigs in my Etsy store!  I can do Usagi Tsukino/Sailor Moon, Princess Serenity, and Queen Serenity.  I can also do Black/Wicked Lady, but that will cost extra due to the materials needed.  In addition to the moon family, I can also do other Sailor Senshi and many other anime and video game characters!  However... I will not do spiky wigs at this time.

If you are interested, check out my Etsy Shop!  More information can be viewed there!

Friday, July 15, 2011

I'm still around!

Hey, everyone!  I'm still around!  Severe lack of updates due to many reasons, like me being ticked off about something that happened, and cosplay work.  Did two wig commissions in two weeks (rush orders) which nearly killed me.  Needless to say, I will not be doing that ever again.  My Serenity dress was finished a while ago!  The only thing I didn't get around to doing were a pair of proper sleeves... I need to play around with resin and/or craft foam and craft foam for that.  That'll be finished at another time.

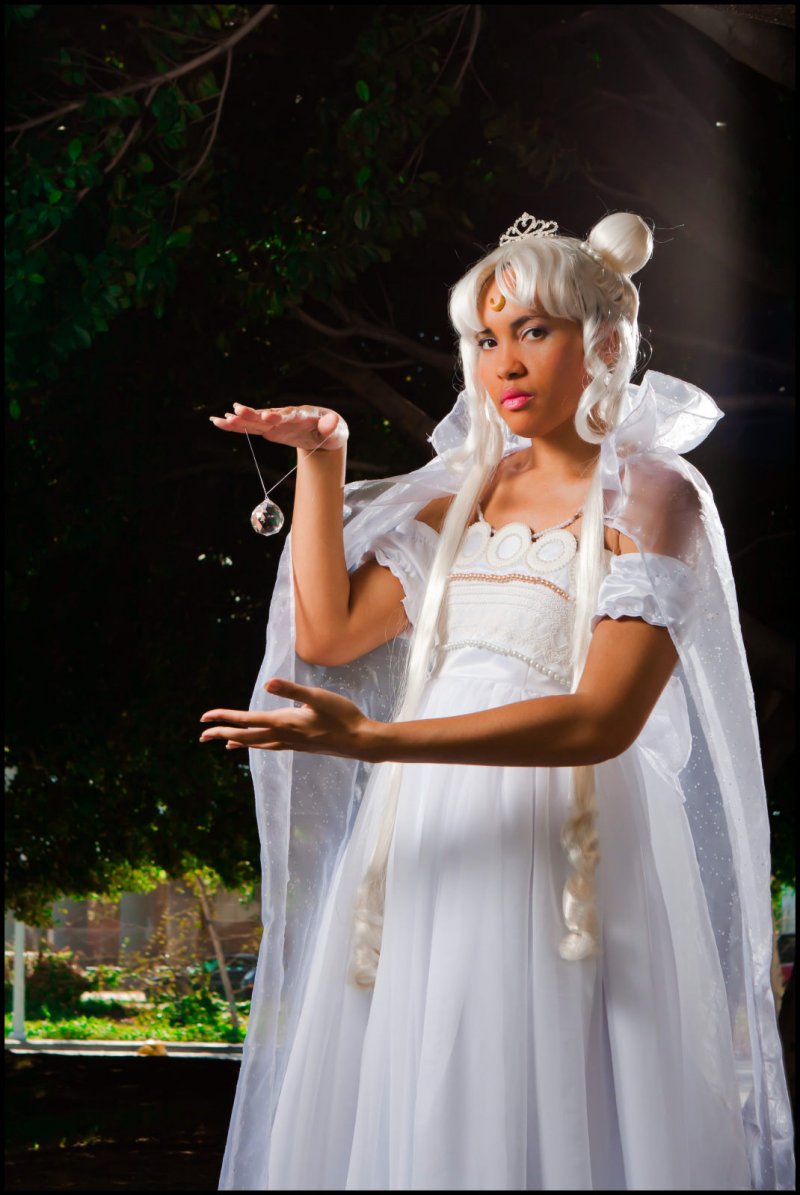
Anyway, here's a picture from a photoshoot I did in this dress!


For a better view... click on the picture. Lol

Model is me
Photo by roflwaffles
Edited by my friend John Paul


I have more pictures, but I'll upload them when I'm feeling more like myself and not in lots of pain.

Monday, April 4, 2011

More progress n stuff

I'm doing somewhat better now... I've been working on two wigs for people and very slowly working on my gown.  My lace came in last month so I've been able to finish the bodice!

Saturday, February 19, 2011

Serenity progress 3

This thing took a lot longer than I would have liked... I remember working on it from when the sun was up to when the sky was pitch black.  So I think I've spent almost five hours doing the gold beading and adding the first white strip?  The white strips are white textured rope braid and my sewing machine hated sewing through it.  Ugh.  There's still two more strips I have to add, but I'm not doing that until my lace eventually comes in, which'll hopefully arrive within the next few weeks.

I've made a mistake when sewing the strip on and because of that, I hate this bodice so much.  Guergh... nothing I can do about that now, sadly...

Not even done and this thing is already heavy as heck because of the white rings and glass beads.  When this part is finished, it's going to be even heavier so I may end up having to install some clear bra straps if it doesn't stay up due to the added weight.  It stays up just fine right now, but... not so sure about later.  I'm still trying to figure out how I'm going to pack this thing in my luggage when it's time to go to AM2 Con and Anime Expo this summer.  The fabric for the skirt is also quite heavy since there's going to be 12 yards of fabric going into that monster... GRAAAAHHH!!!

Tuesday, February 15, 2011

Serenity gown progress [Part 2]

Hahaaaa... wow.  This is quite annoying.  Firefox won't let me update, so I have to do it on a browser that I hate.  Ugh.  Anyway, I've spent most of my free time today working on this bloomy dress bodice.


The rings were always a nightmare to attatch to this dress.  This is my second time making this dress and it's never any fun doing this step.  I've come up with an easier method of making the rings, but it's always a huge pain in the butt to sew them on.  Rings are made out of white pleather (that I had leftover from when I made my Crisis Core Aerith shoes), white glitter casa satin, and heavy interfacing for added stiffness.  At first, I used straight stitches to attach them, but the edges didn't lay the way I wanted them to so I went over them again with a zig-zag stitch.

The whole process was a complete nightmare and is always my least favorite task when making Serenity's dress.  Boning was added as well since the lining was starting to fray so bad that if I didn't add the lining soon, I probably wouldn't have been able to at all, so I inserted the boning into the casings and serged the fraying bottom edge of the lining.  I'm glad that part is over with at least... now I just have to reinforce the tops of the rings.  After that is done, I can start beading this thing.  I'm still waiting for my lace to come in the mail, but I'm afraid that it may take another month to arrive and I need it now. Grrr!!!